Instance Management
Create a New Instance
You can create a new instance of Genesis based on the needs of your application or environment.
Example: Create separate instances for Development and Production, or create a customized instance for a specific financial workflow, such as Planning or Reporting.
When you create a new instance of Genesis, it will have the default configuration. It is not a copy of an existing instance.
-
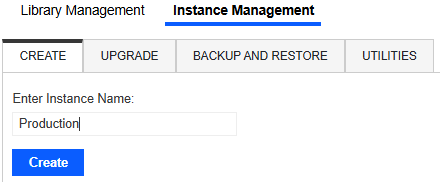
In Settings > Instance Management, click the CREATE tab.
-
In the Enter Instance Name field, enter a new name for the instance.

NOTE: The instance name must be unique and use alphanumeric characters (A–Z, a–z, and 0–9). The maximum number of characters is 80. The name cannot include symbols or reserved words. See Reserved Words.
-
Click the Create button.
Upgrade an Instance
Upgrade an instance of Genesis to the latest release.
-
In OneStream Solution Exchange, go to the Genesis page.
-
In the Download Details drop-down menus, select the appropriate platform version and the most recent Genesis version.
-
Click the DOWNLOAD button.
-
Log in to OneStream.
-
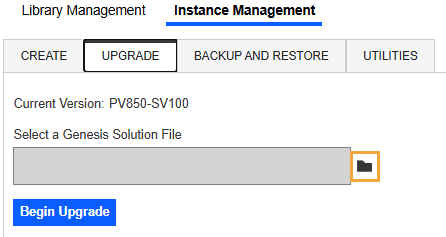
Go to the Genesis instance > Settings > Instance Management > UPGRADE.
-
Click the Upload Upgrade Instance button.

-
Select the new solution package, and click the Open button.
IMPORTANT: The file must be a .zip Genesis package for an updated version. The current version is listed on the UPGRADE page.
-
When the selected file name displays in the Select a Genesis Solution File field, click the Begin Upgrade button.
IMPORTANT: After you click the Begin Upgrade button, the upgrade is in progress. Do not navigate away from the page while the upgrade is in progress.
NOTE: As part of the upgrade, backup files of the instance are created and saved in the location specified on the BACKUP AND RESTORE page. These backup files can be used to restore the instance to a previous state. See Back Up an Instance.
-
When the Upgrade in Progress screen displays, click the Complete Upgrade button.
IMPORTANT: Do not navigate away from the page until the upgrade is complete.
-
When the upgrade is complete, a message box will display with a confirmation. To close the message box, click the OK button.
Back Up an Instance
You can back up an instance to ensure it can be restored in the future if needed. See Restore an Instance.
When you back up an instance, you can choose to save either the full Genesis Workspace (Full backup) or only the customizations and configurations (App Settings backup).
-
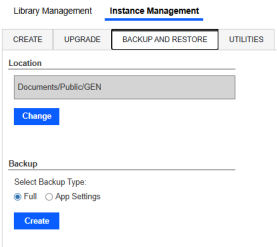
In Settings > Instance Management, click the BACKUP AND RESTORE tab.
-
In the Location field, there is a default location for the backup files to be saved in OneStream.
NOTE: To update the location, click the Change button, select a new folder in the Application Database, and click the Select Folder button.
-
Under Backup, select the type of backup file to create.
-
Full: Each instance of Genesis is a unique Workspace. Full is an export of the full Genesis Workspace. It is a compressed .xml file. This option enables you to revert completely to a previous state.
-
App Settings: This file includes customizations and configurations made in Genesis. This includes the Application Group settings, Navigation Groups and settings, Pages and settings, Page links, the selected color set, and style settings. It is a compressed .json file. This option enables you to copy the customizations and configurations to another instance.

-
-
Click the Create button.
Restore an Instance
If you have a backup file, you can use it to restore an instance. See Back Up an Instance.
When you restore an instance, it will replace either the full Genesis Workspace (Full backup) or the customizations and configurations (App Settings backup).
-
In Settings > Instance Management, click the BACKUP AND RESTORE tab.
-
Under Restore, select the type of backup file to restore the instance.
- Full: This file is the full Genesis Workspace. It is a compressed .xml file. This option enables you to revert completely to a previous state.
-
App Settings: This file includes customizations and configurations made in Genesis. This includes the Application Group settings, Navigation Groups and settings, Pages and settings, Page links, the selected color set, and style settings. It is a compressed .json file. This option enables you to copy the customizations and configurations to another instance.
-
In the Select File drop-down menu, select a backup file. The field will display a list of files from the default location that match the selected backup file type.
-
Click the Restore button.
Set the Default for the Preview Tab
In Designer Home, the Preview tab displays the preview of the end-user view. You can set the default state for the instance to turn the preview on or off.
-
In Settings > Instance Management, click the UTILITIES tab.
-
Under Default Preview State, select the option to set as the default Preview tab display for the instance.
-
Show: Displays a preview of the end-user view
-
Hide: Displays a message indicating the preview is disabled

-
NOTE: The default setting is applied for all users when the Preview pane is loaded, but users can turn the preview on (click the Show Preview ![]() button) or off (click the Hide Preview
button) or off (click the Hide Preview ![]() button).
button).


